DNS認証(WEBサーバーなし)でLet’s EncryptのSSL証明書を発行

Azure,DNS

Let’s EncryptのDNS-01 challengeを利用したSSL証明書発行手順の紹介です。

Let’s Encryptのドメイン検証方法の1つにDNS-01 challenge(DNS認証)があります。
DNS-01 challengeを使用するとDNSのTXTレコード認証でSSL証明書発行する事ができます。
つまりWEBサーバーを準備しなくてもLet’s EncryptのSSL証明書が発行できます。

事前準備としてのパッケージインストールから証明書発行までの手順をまとめています。
pem形式からpfx形式への変換、キーコンテナ(Azure Key Vault)へのアップロード手順も紹介しています。

    • パッケージインストール(Certbot、snapd)
    • DNS-01 challengeでSSL証明書発行
    • pem形式からpfx形式へ変換
    • キーコンテナー(Azure Key Vault)へのアップロード

※OSはRocky Linux release 8.9 (Green Obsidian)を使用しています。
※DNSはAzure DNSを使用しています。

スポンサーリンク

DNS-01 challengeでLet’s EncryptのSSL証明書を発行

証明書発行方法は大きく分けて3種類

Let’s Encryptの証明書発行時のドメイン検証方法は大きく分けて3種類あります。

チャレンジの種類(Let’s Encrypt)

    • HTTP-01 challenge
      • WEBサーバーを利用して証明書の発行を行う方法
      • standaloneモードを使用すれば、Certbot内で起動するWEBサーバーを利用して発行が可能
      • 外部から80番ポートへのアクセスが許可されている事が必要
    • DNS-01 challenge
      • DNSのTXTレコードを利用して証明書の発行を行う方法
      • WEBサーバーがなくても証明書の発行が可能
    • TLS-ALPN-01
      • ACMEプロトコルのTLS拡張を利用して証明書の認証を行う方法
      • WEBサーバーがHTTPSをサポートし指定されたTLS拡張が有効である事が必要

今回はDNS-01 challengeでのSSL証明書発行手順を確認します。

HTTP-01 challengeでの証明書発行手順についてはこちらに纏めています。
併せて見て頂けると有難いです。

パッケージインストール

証明書発行に必要なパッケージをインストールします。
公式サイトで推奨されているCertbot(ACMEクライアント)を使用します。

Getting Started

Let’s Encryptの証明書発行に必要なCertbotをインストールします。
Certbotのインストール時に利用するsnapd、snapdインストール時に必要なepel-releaseも併せてインストールします。

パッケージインストール

epelリポジトリ(epel-release)をインストールします。

[root@test-vm-01 ~]# dnf -y install epel-release
Last metadata expiration check: 0:05:01 ago on Sat 10 Feb 2024 06:30:10 AM UTC.
Dependencies resolved.
================================================================================
Package Architecture Version Repository Size
================================================================================
Installing:
epel-release noarch 8-18.el8 extras 24 k

Transaction Summary
================================================================================
Install 1 Package

~(以下略)~

snapdをインストールします。
snapdのインストール手順はServer World様のサイトを参考にしています。

Snappy : インストール(Server World)

[root@test-vm-01 ~]# dnf –enablerepo=epel -y install snapd
Last metadata expiration check: 0:06:54 ago on Sat 10 Feb 2024 06:39:18 AM UTC.
Dependencies resolved.
================================================================================
Package Architecture Version Repository Size
================================================================================
Installing:
snapd x86_64 2.61.1-0.el8 epel 18 M
Installing dependencies:
bash-completion noarch 1:2.7-5.el8 baseos 272 k
libpkgconf x86_64 1.4.2-1.el8 baseos 34 k
pkgconf x86_64 1.4.2-1.el8 baseos 37 k
pkgconf-m4 noarch 1.4.2-1.el8 baseos 16 k
pkgconf-pkg-config x86_64 1.4.2-1.el8 baseos 14 k
snap-confine x86_64 2.61.1-0.el8 epel 3.8 M
snapd-selinux noarch 2.61.1-0.el8 epel 560 k

Transaction Summary
================================================================================
Install 8 Packages

~(以下略)~

snapを設定します。

[root@test-vm-01 ~]# ln -s /var/lib/snapd/snap /snap 
[root@test-vm-01 ~]# echo 'export PATH=$PATH:/var/lib/snapd/snap/bin’ > /etc/profile.d/snap.sh
[root@test-vm-01 ~]# systemctl enable –now snapd.service snapd.socket
Created symlink /etc/systemd/system/multi-user.target.wants/snapd.service → /usr/lib/systemd/system/snapd.service.
Created symlink /etc/systemd/system/sockets.target.wants/snapd.socket → /usr/lib/systemd/system/snapd.socket.

snapを使用してcertbotをインストールします。
snapのコマンドについては以下のサイトを参考にしています。

Snap(archlinux)

[root@test-vm-01 ~]# snap install certbot –classic
Warning: /var/lib/snapd/snap/bin was not found in your $PATH. If you’ve not
restarted your session since you installed snapd, try doing that.
Please see https://forum.snapcraft.io/t/9469 for more details.

certbot 2.8.0 from Certbot Project (certbot-eff?) installed
[root@test-vm-01 ~]# snap list
Name Version Rev Tracking Publisher Notes
certbot 2.8.0 3566 latest/stable certbot-eff? classic
core 16-2.60.4 16202 latest/stable canonical? core
core20 20231123 2105 latest/stable canonical? base

DNS-01 challengeでSSL証明書発行

DNS-01 challengeを使用してSSL証明書を発行します。
DNS-01 challengeを使用する場合は、certbot実行時に–preferred-challenges dnsと指定します。
certbot実行後に発行された値をTXTレコードに設定します。

※DNSにはAzure DNSを使用しています。

SSL証明書発行

certbotでSSL証明書を発行します。
DNS-01 challengeを使用する場合は–preferred-challenges dnsと指定します。
-dで発行する証明書のドメイン名を指定します。

※手順のサンプルドメインをwww.example.comとしています。
※パスが正常に動作していない場合は/snap/bin/配下で./certbotとしてコマンドを実行してください。

[root@test-vm-01 ~]# certbot certonly –manual -d www.example.com –preferred-challenges dns

Saving debug log to /var/log/letsencrypt/letsencrypt.log
Enter email address (used for urgent renewal and security notices)
(Enter 'c’ to cancel): メールアドレス(admin@example.com) #管理者のメールアドレス

– – – – – – – – – – – – – – – – – – – – – – – – – – – – – – – – – – – – – – – –
Please read the Terms of Service at
https://letsencrypt.org/documents/LE-SA-v1.4-April-3-2024.pdf. You must agree in
order to register with the ACME server. Do you agree?
– – – – – – – – – – – – – – – – – – – – – – – – – – – – – – – – – – – – – – – –
(Y)es/(N)o: Y #規約同意の確認

– – – – – – – – – – – – – – – – – – – – – – – – – – – – – – – – – – – – – – – –
Would you be willing, once your first certificate is successfully issued, to
share your email address with the Electronic Frontier Foundation, a founding
partner of the Let’s Encrypt project and the non-profit organization that
develops Certbot? We’d like to send you email about our work encrypting the web,
EFF news, campaigns, and ways to support digital freedom.
– – – – – – – – – – – – – – – – – – – – – – – – – – – – – – – – – – – – – – – –
(Y)es/(N)o: N #案内メールの送信確認
Account registered.
Requesting a certificate for www.example.com

– – – – – – – – – – – – – – – – – – – – – – – – – – – – – – – – – – – – – – – –
Please deploy a DNS TXT record under the name:

_acme-challenge.www.example.com. #TXTレコードの名前

with the following value:

nIDG1NUDpaV—————xp-0pq10rgiPDPM96_lDc #TXTレコードに設定する値

Before continuing, verify the TXT record has been deployed. Depending on the DNS
provider, this may take some time, from a few seconds to multiple minutes. You can
check if it has finished deploying with aid of online tools, such as the Google
Admin Toolbox: https://toolbox.googleapps.com/apps/dig/#TXT/_acme-challenge.www.example.com.
Look for one or more bolded line(s) below the line ';ANSWER’. It should show the
value(s) you’ve just added.

– – – – – – – – – – – – – – – – – – – – – – – – – – – – – – – – – – – – – – – –
Press Enter to Continue

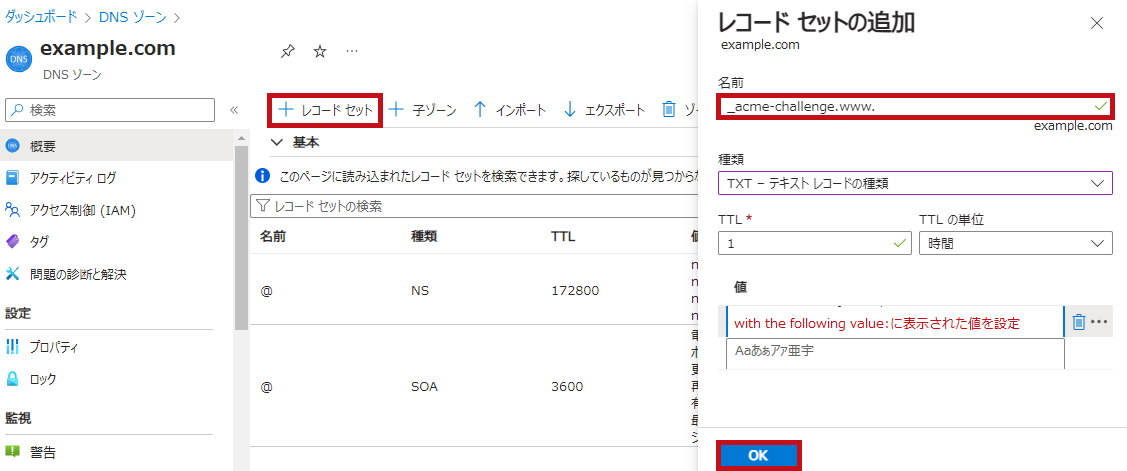
DNSでTXTレコードを設定します。
名前には_acme-challenge.ドメイン名を設定します。
レコード値には発行された値を設定します。

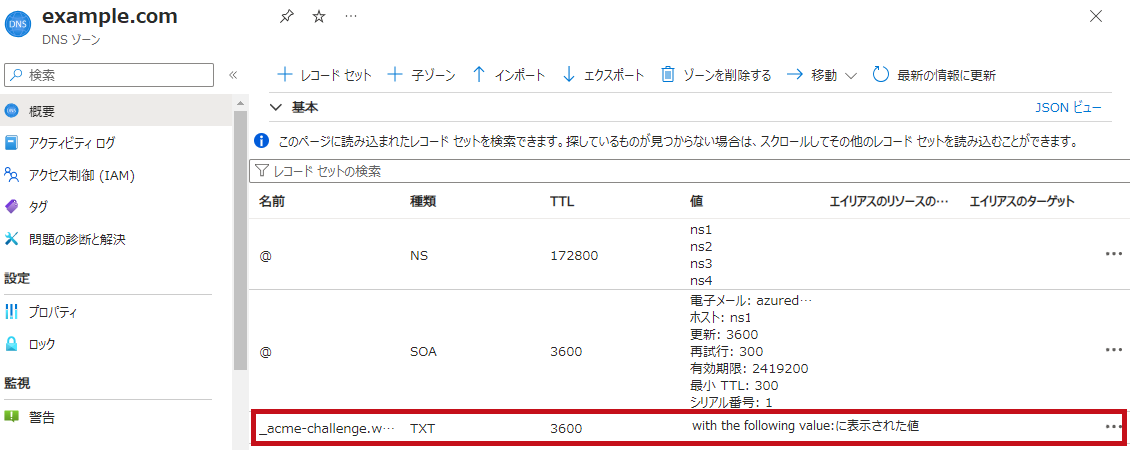
追加したレコードが表示されている事を確認します。

TXTレコード追加後にエンターをクリックして処理を再開します。
DNSのTXTレコードを利用したドメイン検証が完了すると証明書ファイルが生成されます。

Press Enter to Continue #DNSにTXTレコード設定後、処理を再開します

Successfully received certificate.
Certificate is saved at: /etc/letsencrypt/live/www.example.com/fullchain.pem
Key is saved at: /etc/letsencrypt/live/www.example.com/privkey.pem
This certificate expires on 2024-05-10.
These files will be updated when the certificate renews.

NEXT STEPS:
– This certificate will not be renewed automatically. Autorenewal of –manual certificates requires the use of an authentication hook script (–manual-auth-hook) but one was not provided. To renew this certificate, repeat this same certbot command before the certificate’s expiry date.

– – – – – – – – – – – – – – – – – – – – – – – – – – – – – – – – – – – – – – – –
If you like Certbot, please consider supporting our work by:
* Donating to ISRG / Let’s Encrypt: https://letsencrypt.org/donate
* Donating to EFF: https://eff.org/donate-le
– – – – – – – – – – – – – – – – – – – – – – – – – – – – – – – – – – – – – – – –

/etc/letsencrypt/live/ドメイン名/配下に4つのファイルが生成されています。

    • cert.pem:SSL証明書
    • chain.pem:中間証明書
    • fullchain.pem:SSL証明書と中間証明書
    • privkey.pem:秘密鍵

[root@test-vm-01 ~]# ls -l /etc/letsencrypt/live/www.example.com/
total 4
lrwxrwxrwx. 1 root root 45 Feb 10 00:40 cert.pem -> ../../archive/www.example.com/cert1.pem
lrwxrwxrwx. 1 root root 46 Feb 10 00:40 chain.pem -> ../../archive/www.example.com/chain1.pem
lrwxrwxrwx. 1 root root 50 Feb 10 00:40 fullchain.pem -> ../../archive/www.example.com/fullchain1.pem
lrwxrwxrwx. 1 root root 48 Feb 10 00:40 privkey.pem -> ../../archive/www.example.com/privkey1.pem
-rw-r–r–. 1 root root 692 Feb 10 00:40 README

pem形式からpfx形式に変換

発行された証明書をpfx形式に変換して利用する事も出来ます。
opensslコマンドでpem形式からpfx形式に変換します。
pfx形式のSSL証明書はexample.pfxとしています。

    • -export:PFX形式に変換
    • -inkey:秘密鍵ファイルを指定
    • -in:証明書ファイルを指定
    • -out:出力するPFX形式のファイル名を指定
pfx形式に変換

[root@test-vm-01 ~]# cd /etc/letsencrypt/live/www.example.com/
[root@test-vm-01 www.example.com]# openssl pkcs12 -export -inkey privkey.pem -in cert.pem -out example.pfx
Enter Export Password:
Verifying – Enter Export Password:
[root@test-vm-01 www.example.com]# ls -l |grep pfx
-rw——-. 1 root root 1.6K Feb 10 00:55 example.pfx

キーコンテナー(Key Vault)で証明書管理

キーコンテナー(Key Vault)で発行した証明書を管理できます。
キーコンテナー(Key Vault)で管理する事により、有効期限前に通知を受け取ったりAzureリソースから簡単に参照できます。
今回は変換したpfx形式のSSL証明書をアップロードします。

キーコンテナー(Key Vault)のリソース作成、証明書発行、有効期限前の通知などについてはこちらに纏めています。

証明書アップロード

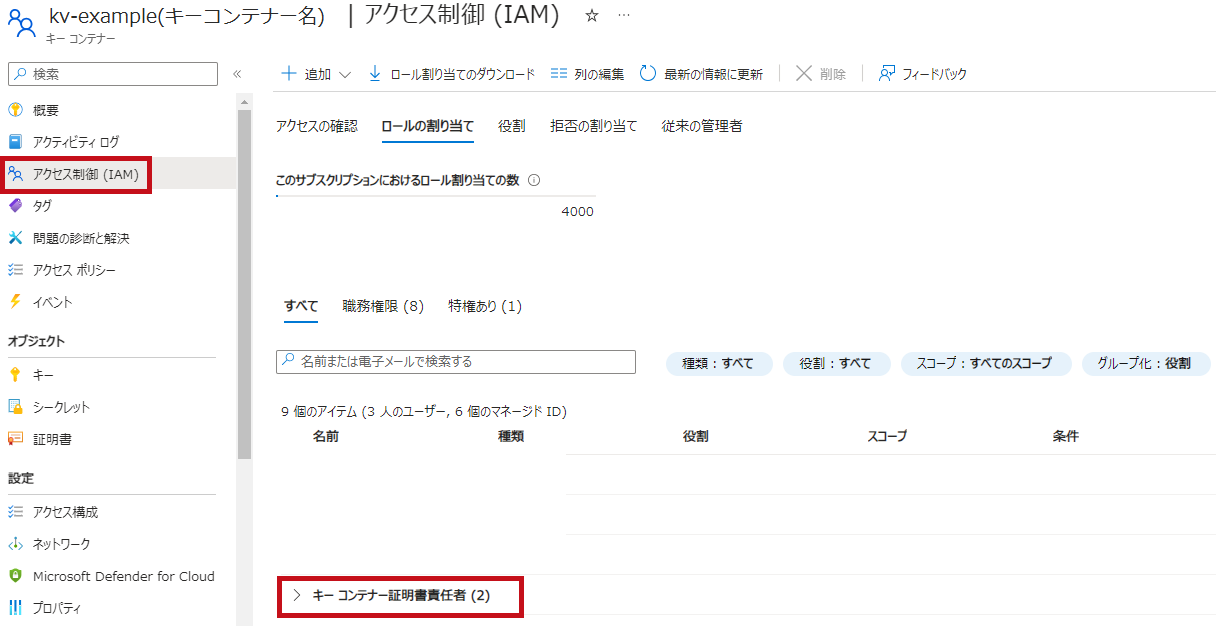
キーコンテナー(Key Vault)で証明書操作する為には権限付与が必要です。事前に割り当てておきます。

※RBACでのアクセス制御を利用しています。
※証明書管理用の権限付与が必要です。キーコンテナー証明書責任者を割り当ててます。

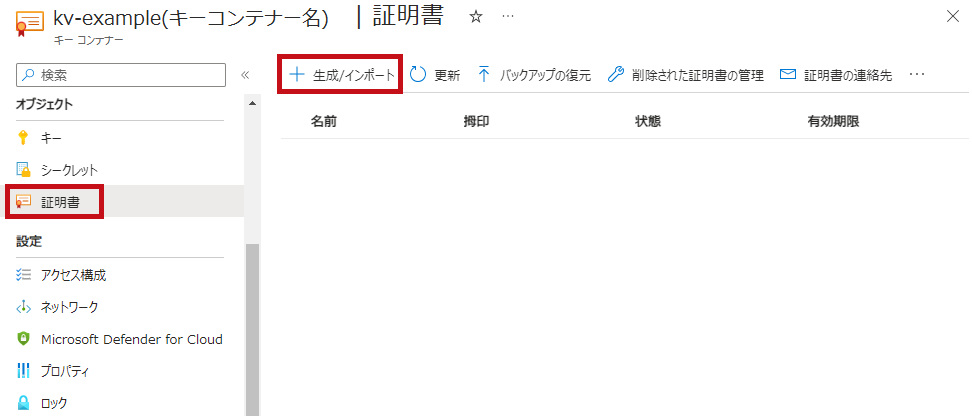
左側のメニューで証明書を選択します。
生成/インポートを選択します。
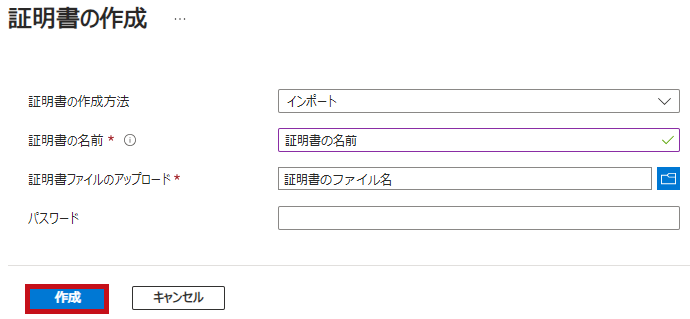
証明書の作成方法でインポートを選択します。
証明書の名前は管理用の名前です。
発行したSSL証明書をアップロードします。
パスワードにはpfx形式変換時に設定したパスワードを入力します。
アップロードが完了すると証明書が表示されます。

最後に

Let’s EncryptのDNS-01 challenge(DNS認証)を利用したSSL証明書発行手順について確認してみました。
DNS-01 challenge(DNS認証)を利用すると、WEBサーバーなくともSSL証明書が発行できました。
DNSレコードを追加する必要がありますが、比較的に簡単に利用する事ができました。

引き続き色々試してみたいと思います。

Azure App Serviceのカスタムドメイン追加や、マネージド証明書発行手順についてはこちらで紹介しています。

スポンサーリンク